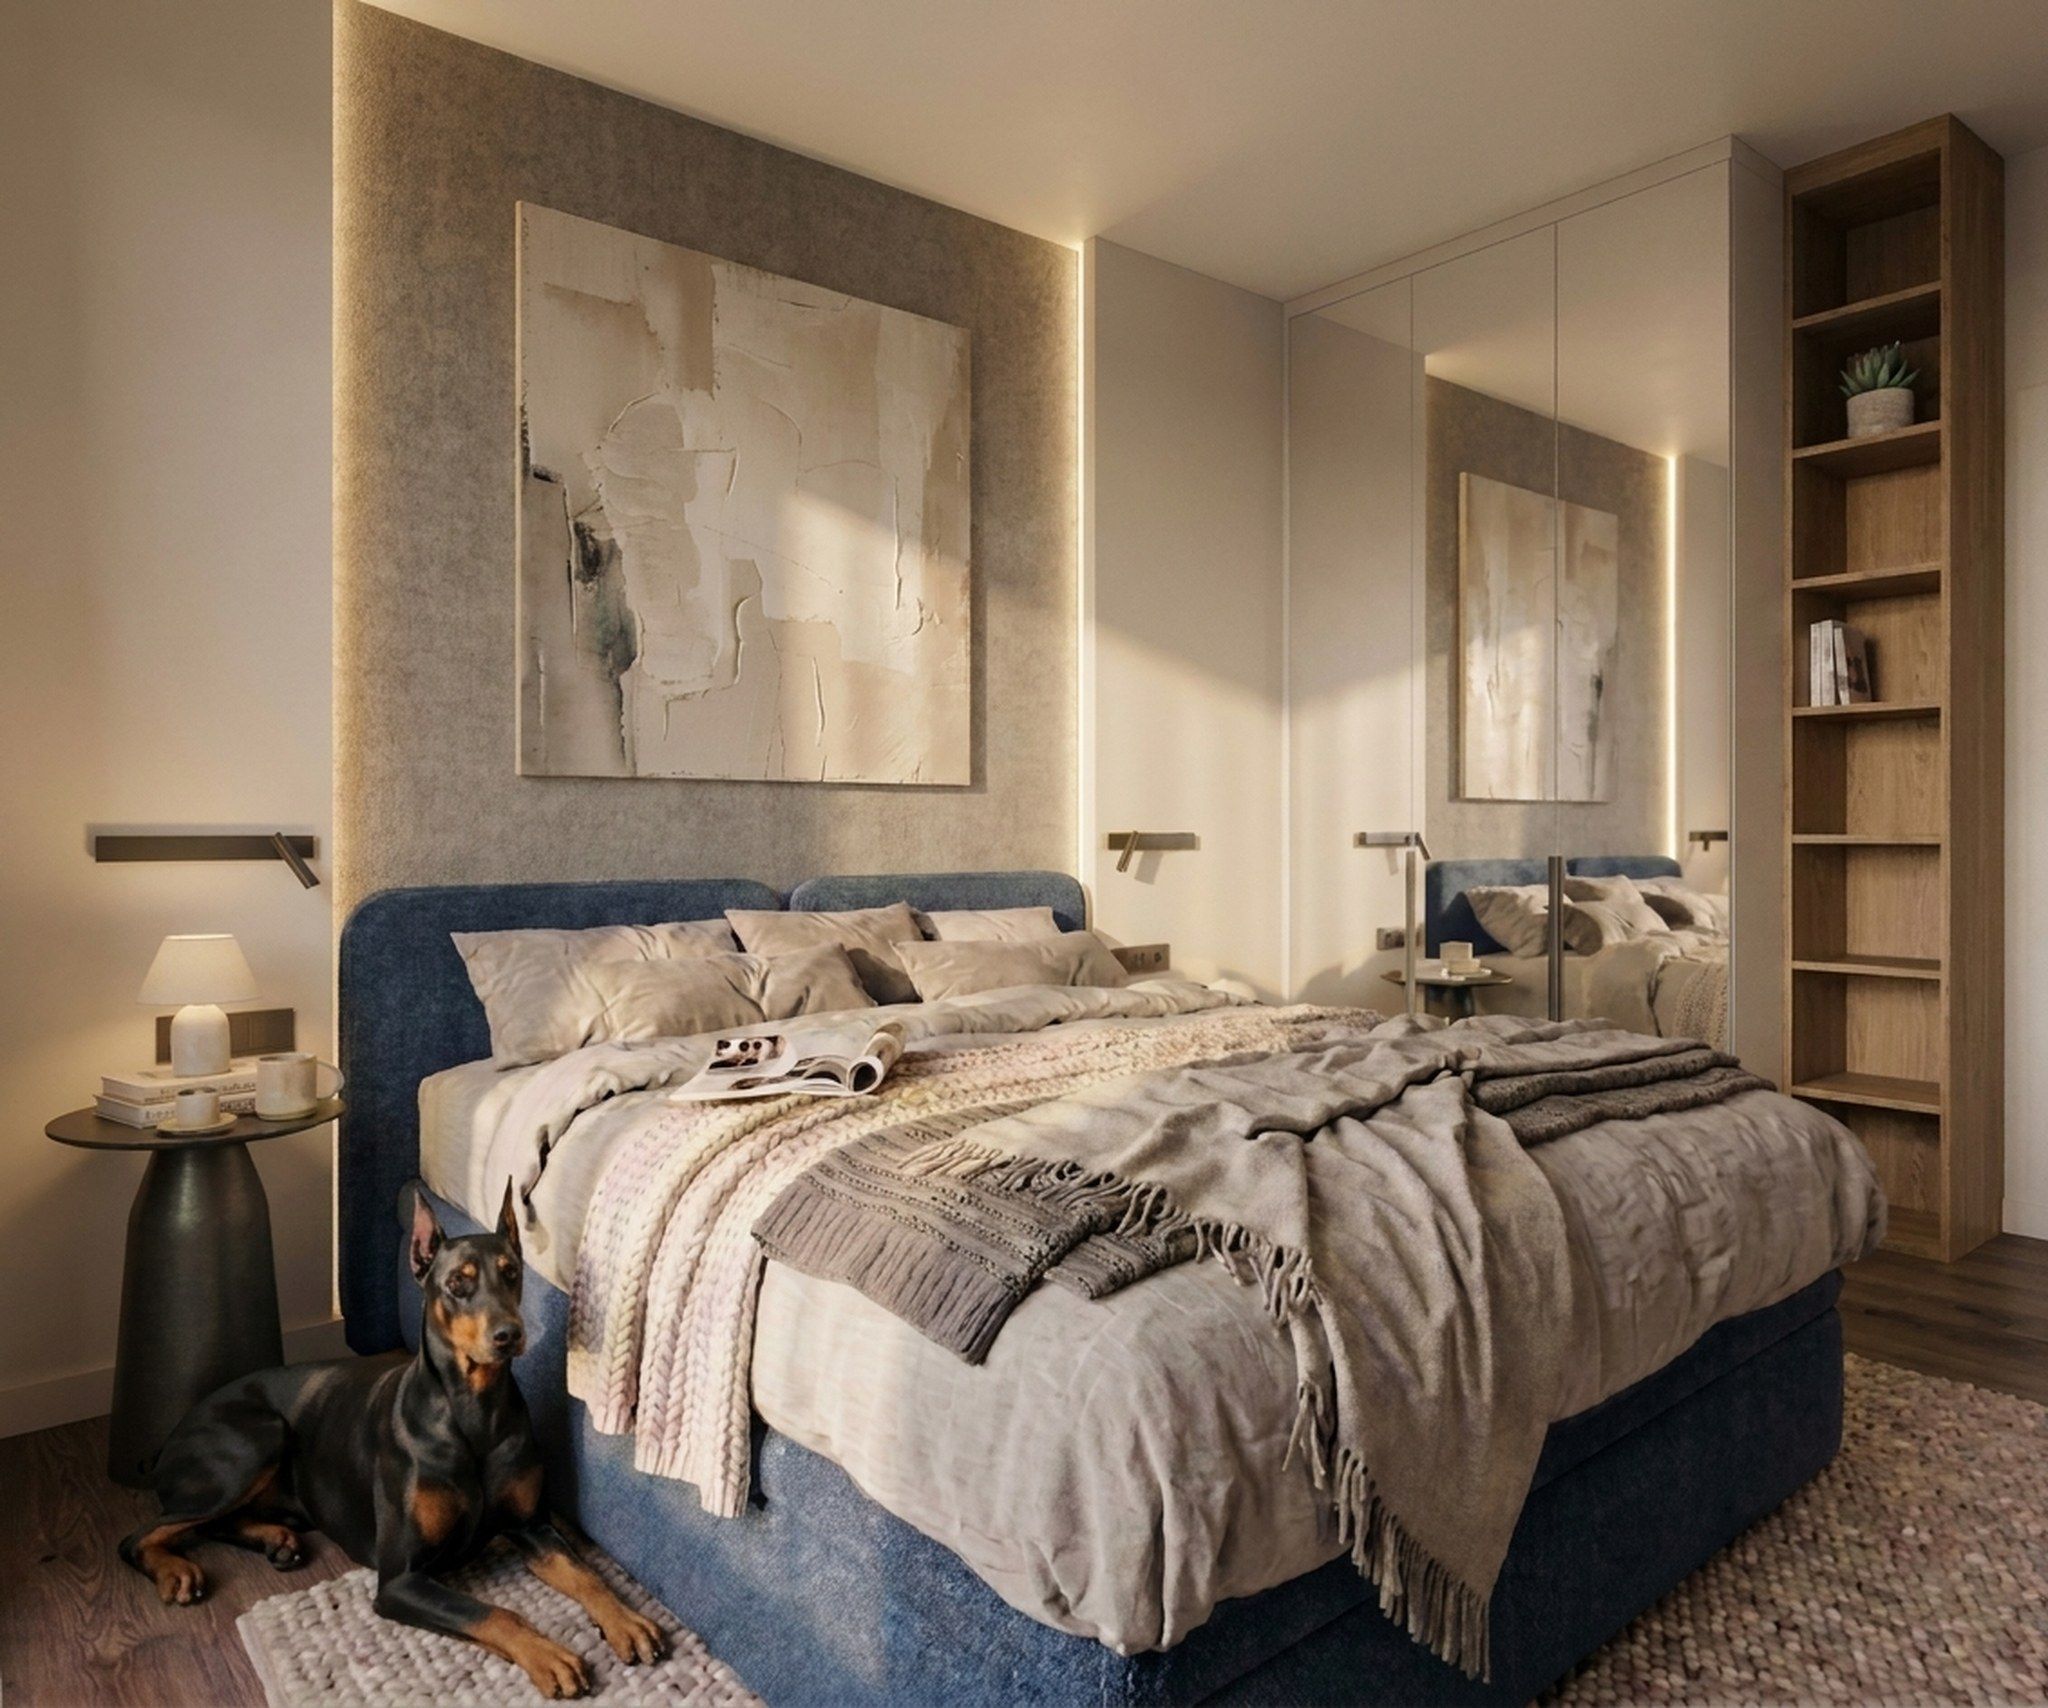
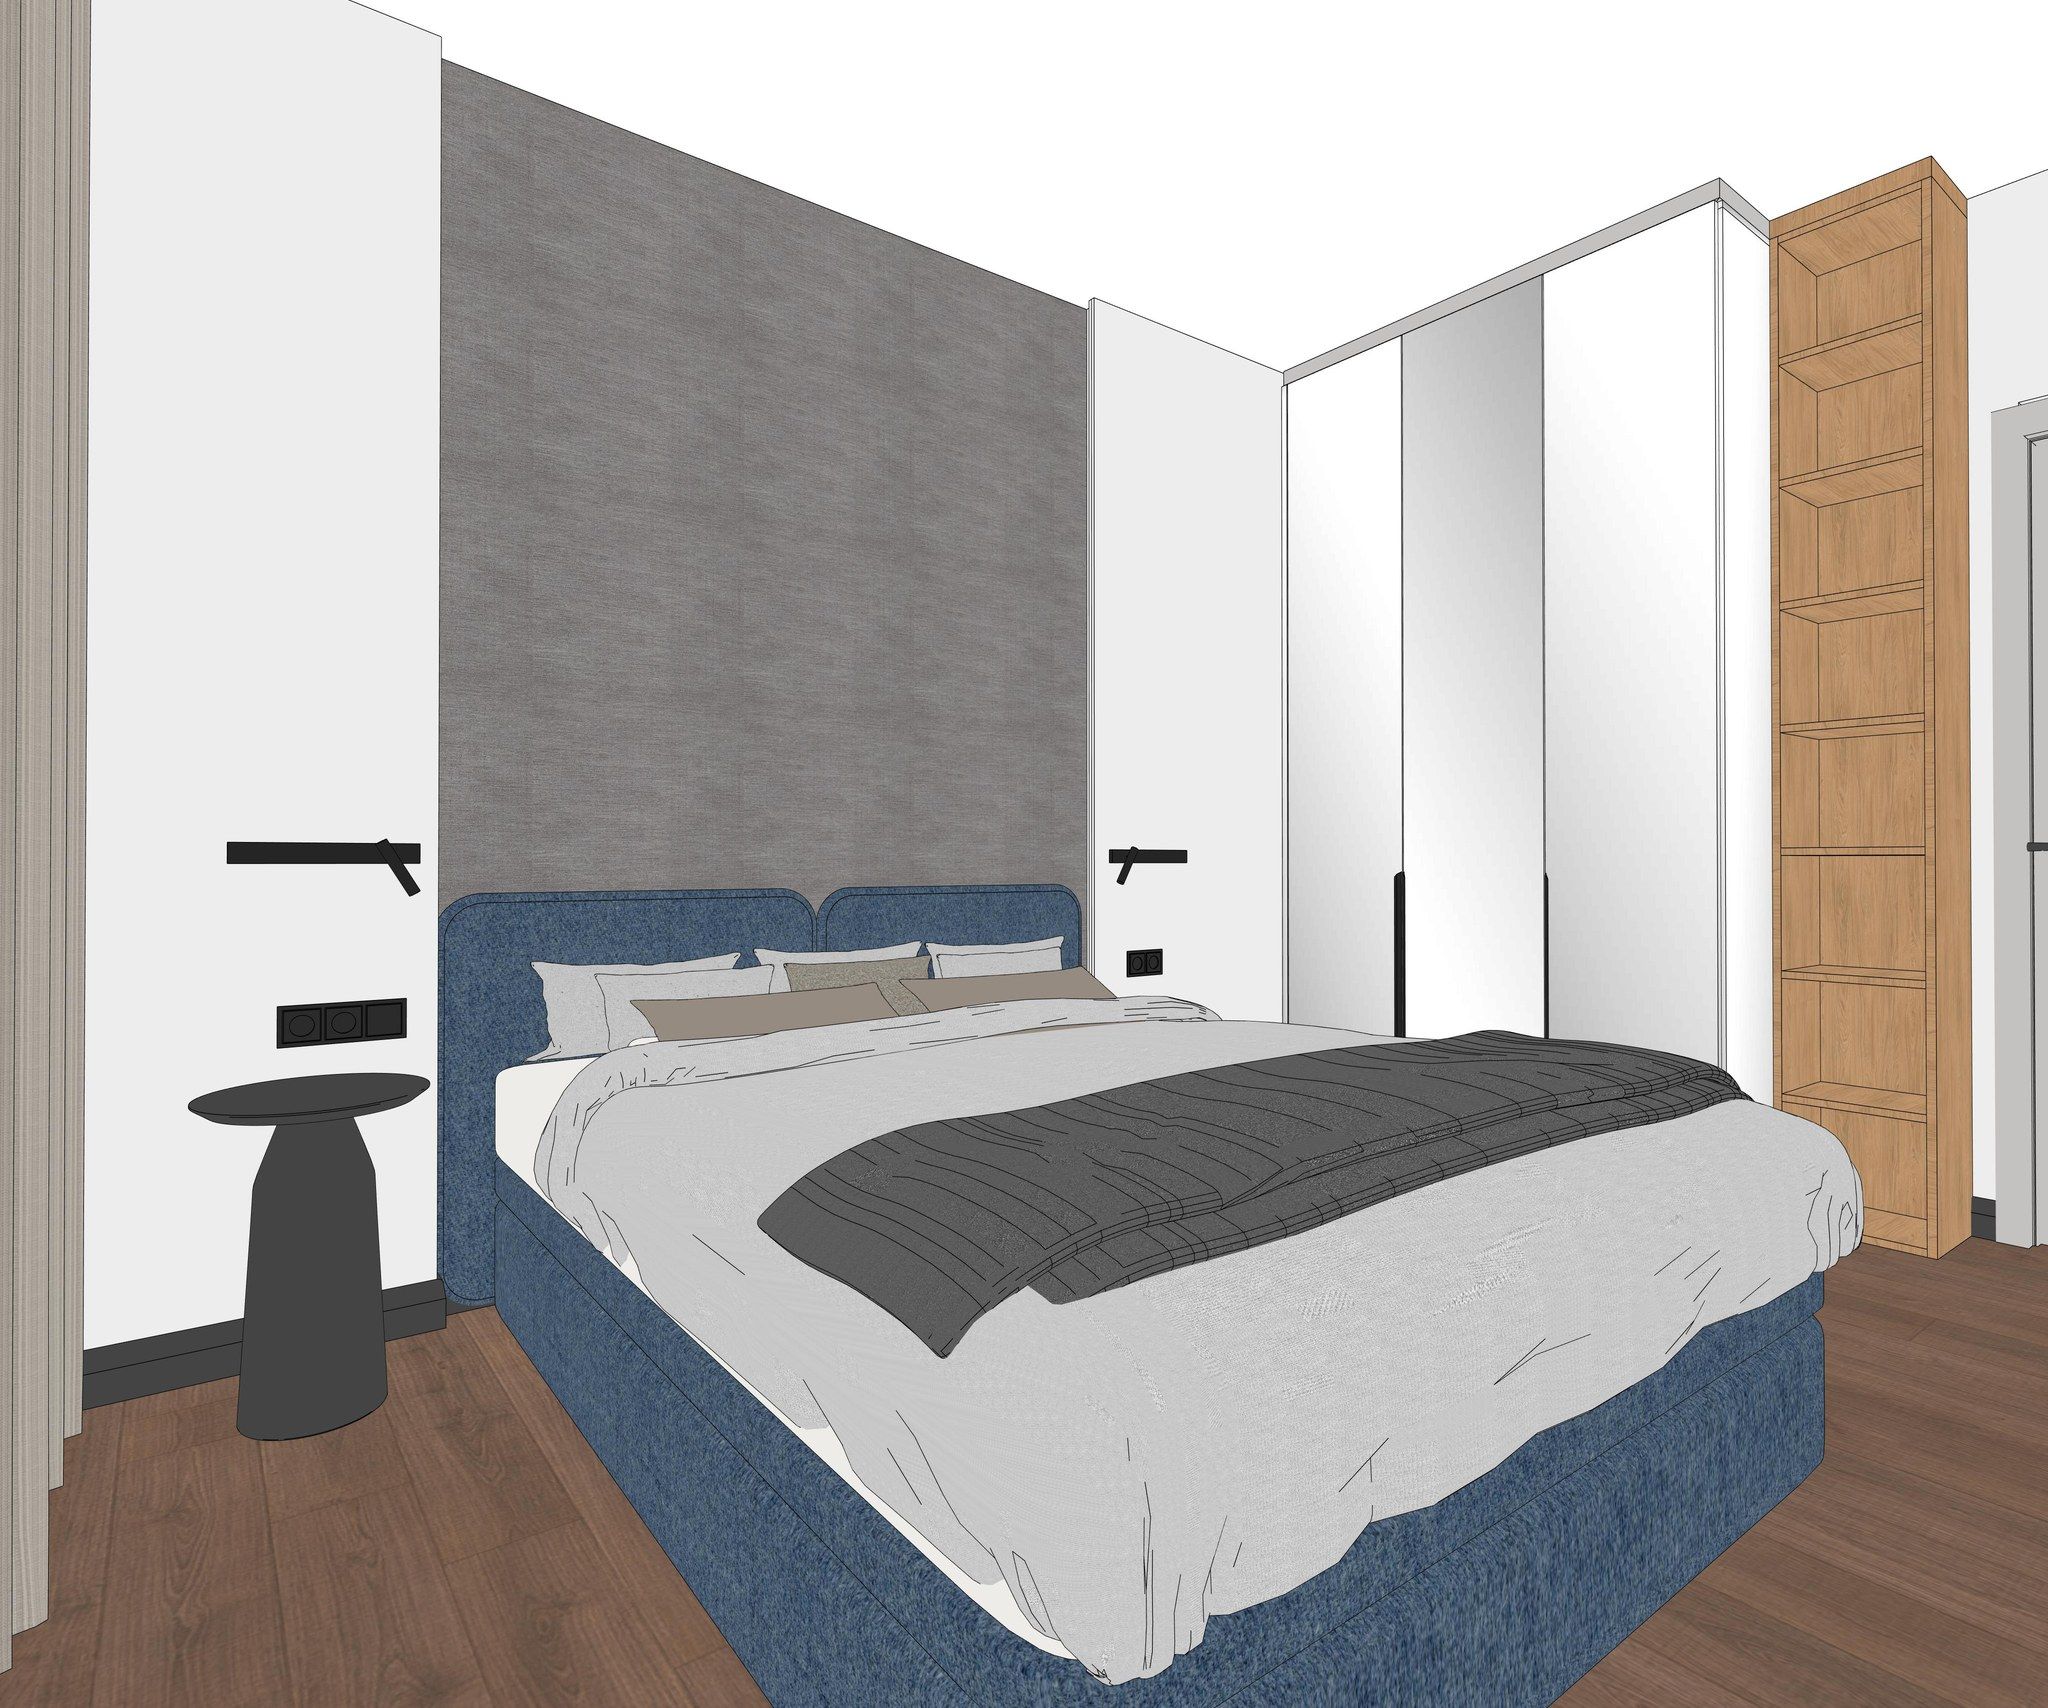
The simplest way: upload your finished render to an AI tool that improves an existing image instead of generating an interior from scratch. It should bring out the light, materials and atmosphere, but leave your design as it is. In KIS List, KISaya does this in 30 seconds, without writing prompts, and places products from your shopping list straight into the visualisation. Below we show how to prepare the file, which settings to choose and how to fine-tune the result.
Why a raw render doesn't convince the client
Your client doesn't see what you see. You look at a raw render and see the finished interior: the light, the textures, the depth and the atmosphere. Your client sees an in-between stage - grey walls, flat materials, an empty room. And if they can't picture the result, it's hard for them to say: "Yes, that's exactly what I meant."
That's where the doubts, the extra revisions and the decisions that drag on for weeks come from. Many changes happen only because the client can't picture the final result. A visualisation that looks like a photo of the finished interior speeds that process up.
Generating from scratch or improving your visualisation
Only improving your own visualisation works for client projects. AI tools work in two ways, and it's worth telling them apart:
- generating from scratch - you write "design me a Japandi living room" and get a pretty image. Except it's not your design: the AI invents the layout, the furniture and the materials;
- improving an existing visualisation - you upload a render or a view from your model, and the AI brings out the realism, the light and a natural look. The layout, furniture and materials stay yours.
The second one isn't "AI, design me a living room", but: "I already have a design - help me show it in a more realistic form, faster". That's exactly how KISaya works. It doesn't create interiors from scratch. The starting point is always your design.
How to prepare a render so the AI reads it well
The result depends most on the file you upload. Before enhancing it, check:
- natural framing - the camera at eye level, the way interiors are photographed;
- a textured model - a raw model with materials applied, not just untextured geometry;
- legible textures - wood, stone, fabrics and tiles should be clearly visible;
- no confusing elements - the AI may interpret anything ambiguous in its own way.
If something in the visualisation is unclear, for example the floor material is hard to recognise, describe it in your instruction: "the floor is microcement". You can upload a view from your model or a finished visualisation from any design software, SketchUp included.
Step by step: improving a visualisation in KISaya
KISaya gives you two ways: a quick one, with no settings, and one where you decide on the details from the first enhancement. You open KISaya from the top menu or from a visualisation that's already on your list - just click the three dots and choose "Enhance visualisation".
Quick: "Generate now"
You pick one of the buttons From model, From model (V2) or From visualisation, and KISaya starts with no settings at all. The buttons use different settings, so it's worth checking on your own visualisations which one gives you the best result. You'll fine-tune the details in the next steps.
With control: "Set up and generate"
- You choose the scene: Interior, Interior (V2), Exterior architecture (a facade, for example) or Garden and surroundings.
- You upload the visualisation.
- You set what you want:
- lighting - from balanced daylight, through morning, afternoon and golden hour, to moody, dramatic light or dusk;
- people - a couple, a man, a woman, children, a dog or a cat, also blurred, in motion;
- decorative elements - "Add life" (flowers, books and accessories chosen for the interior), a modern painting, greenery outside the window, indoor plants;
- your own description - what to remove, add or change, for example what the worktop is made of.
- You choose KISaya's level: Junior for small changes, Experienced for everyday work, Expert (the KISaya level, not the EXPERT plan) for difficult interiors and complex instructions. The levels use different amounts of the AI budget. It's worth testing them on your own projects.
- You click Enhance.
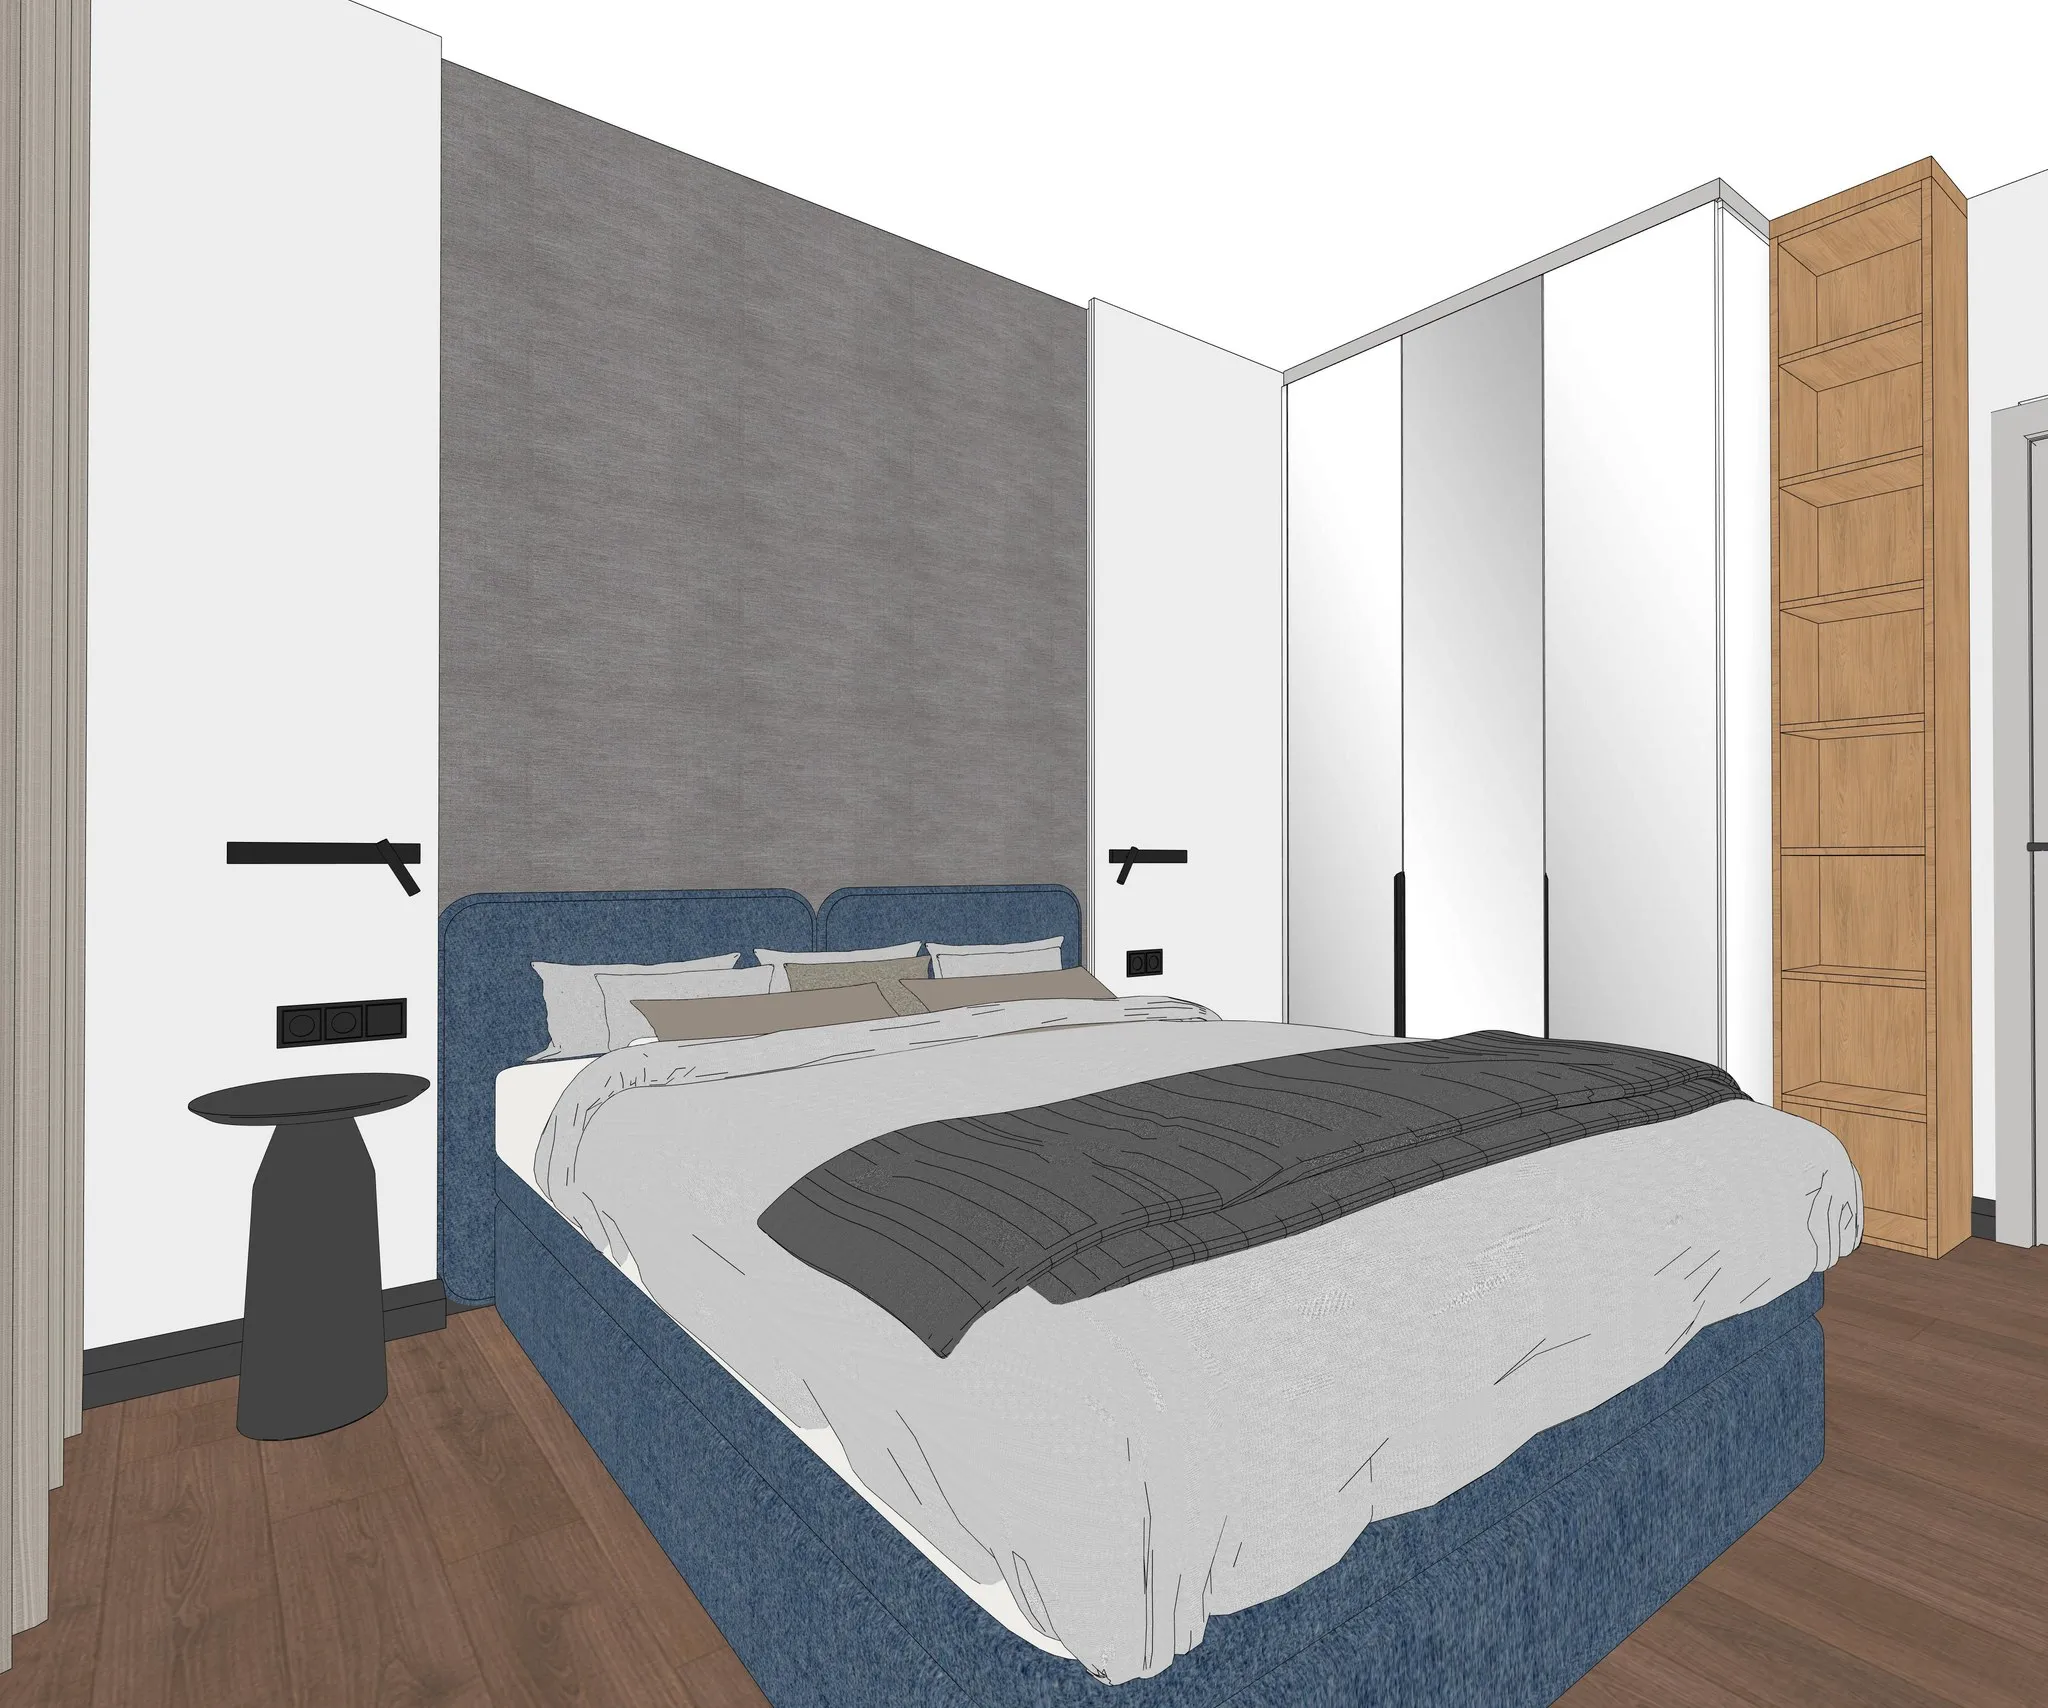
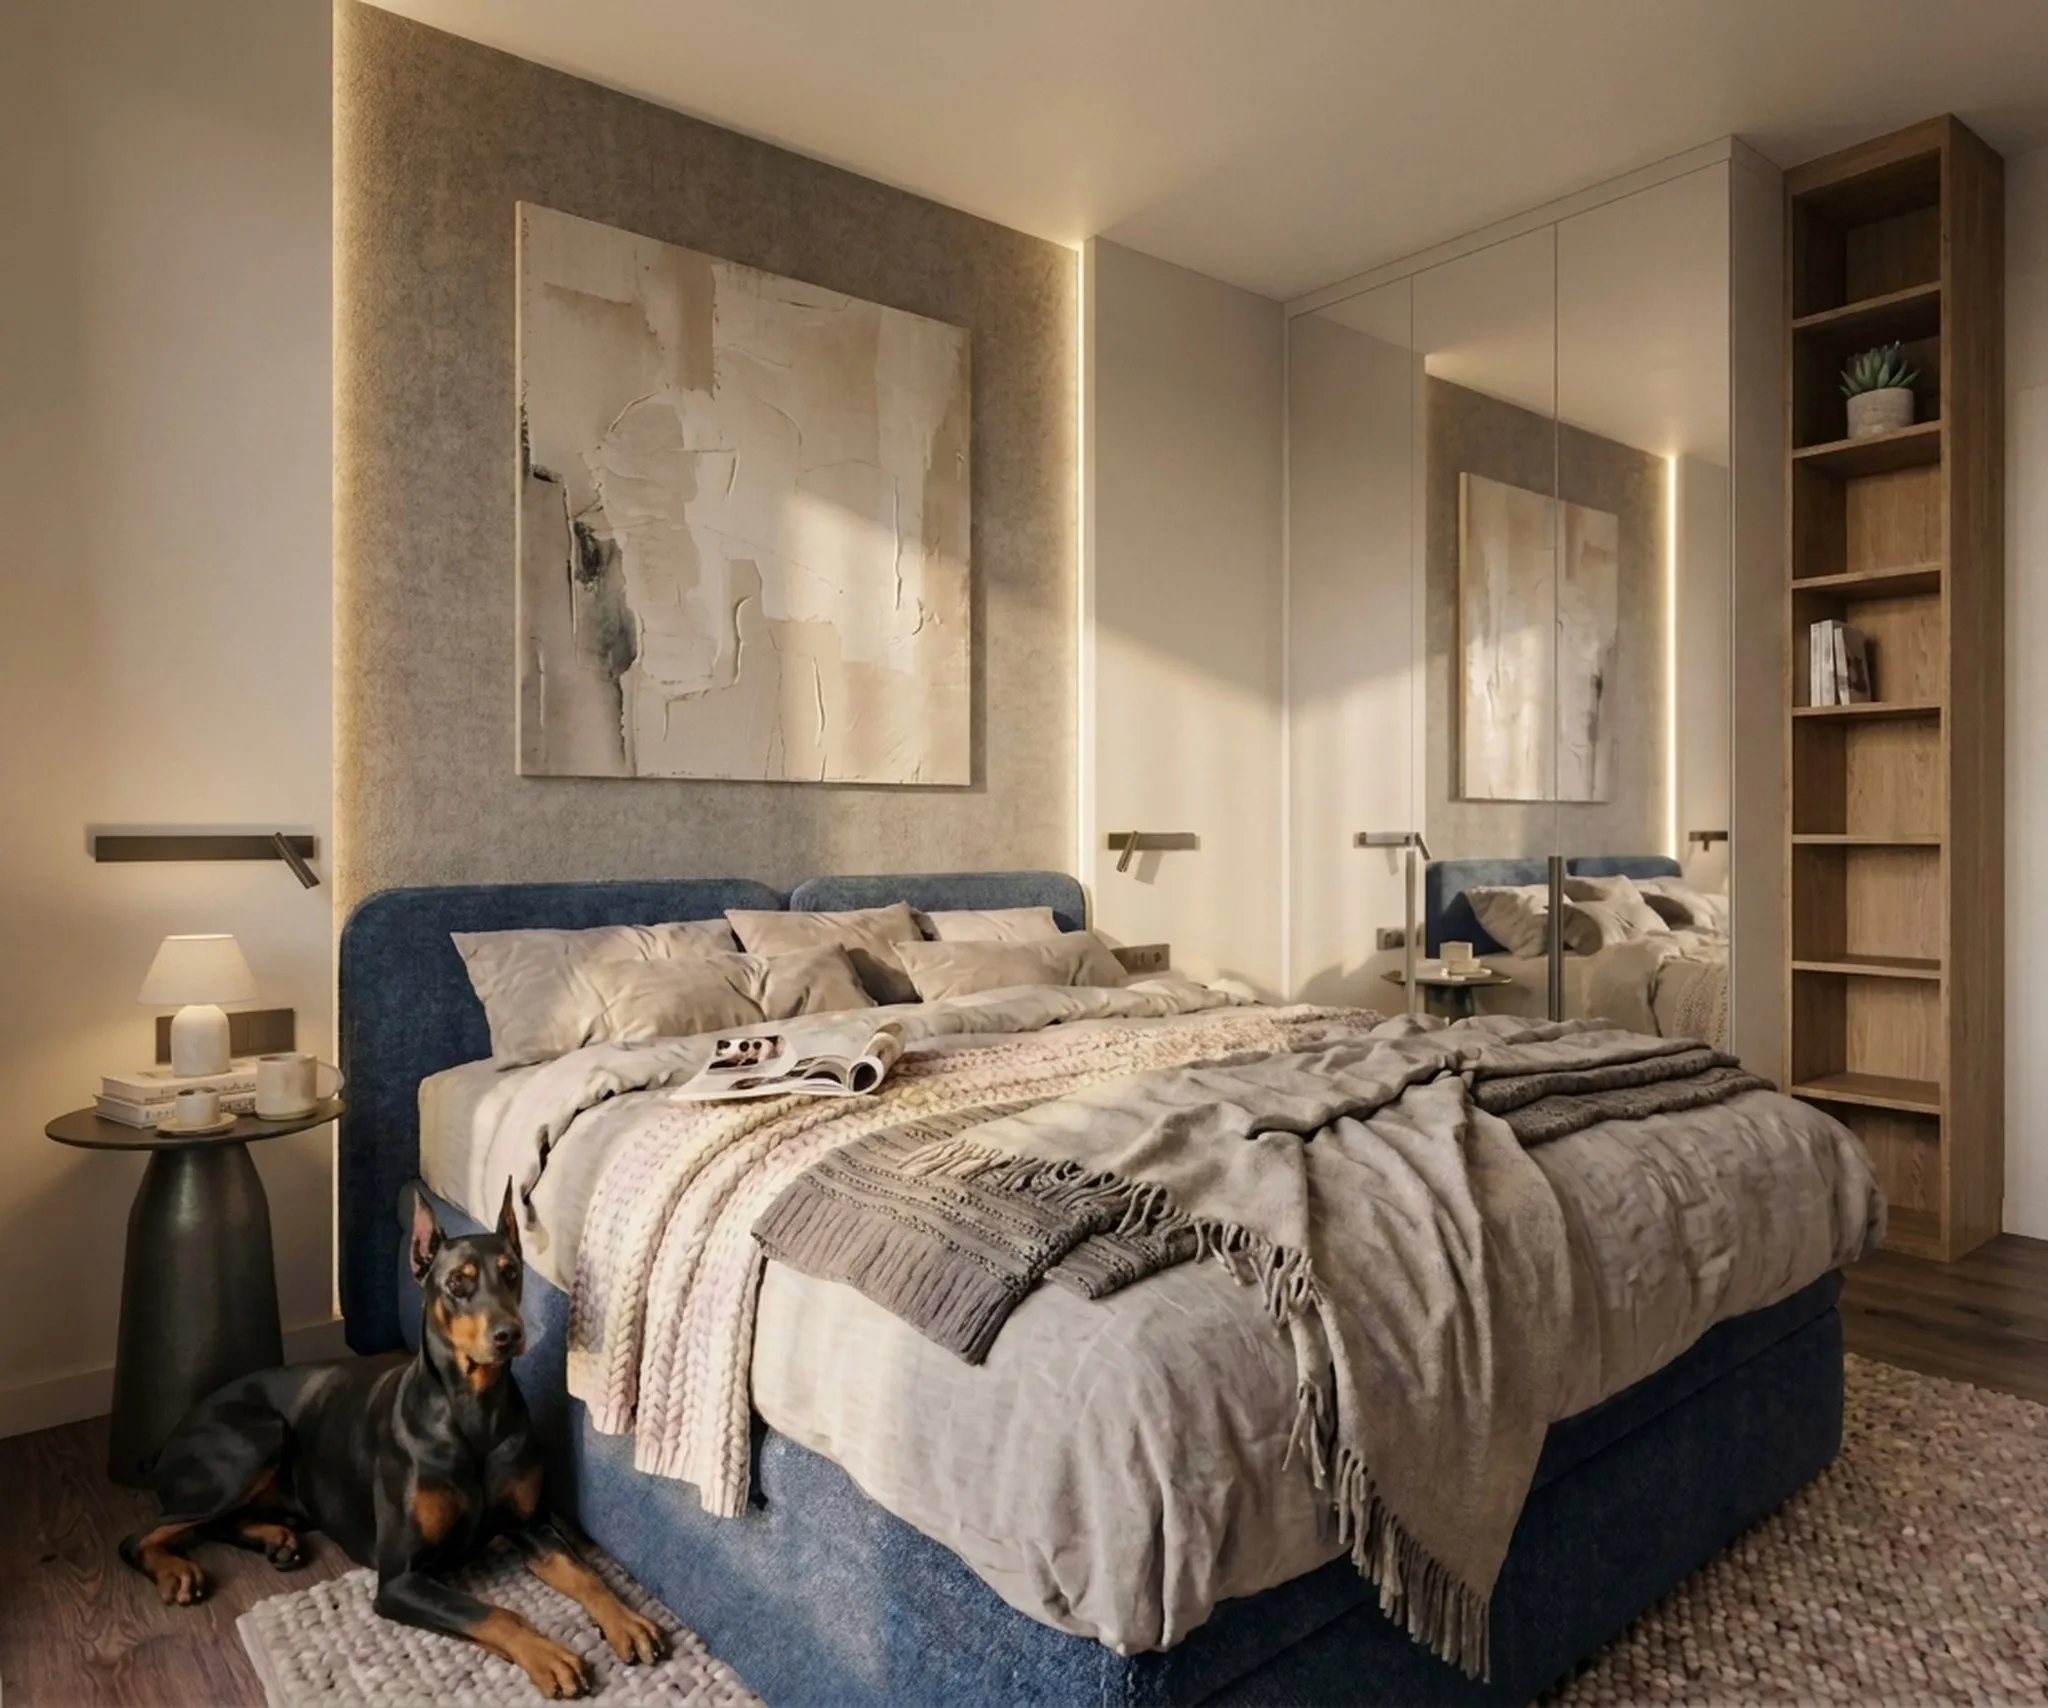
A tip from experience
Greenery outside the window is one of the simplest ways to make a visualisation look real. A view of greenery stops the interior from looking like a scene in an empty 3D program.
Products from your shopping list straight into the visualisation
In KISaya, you place a product you chose for the project into the visualisation straight from your shopping list in KIS List. You don't save photos, upload files or describe the product from scratch.
Picture this: you suggested three kinds of dining chairs to your client, and the client asks you to show how each of them will look in their interior. In KISaya you add a sample and choose "From KIS resources", then the shopping list and the first chair. You write one sentence: "replace the chairs in the visualisation with these chairs". You do the same with the second and the third chair. A few minutes later your client has three visualisations of the same dining room with three different chairs and can choose by looking at their own interior, not at photos from a shop.
It works the same way with materials: a tile, flooring or a fabric. You pick the product from the list and write where it should appear, for example "this is the tile on the kitchen floor".
On top of that you have a reference photo (Style): you add a photo, and KISaya copies its style, light or materials. It comes in handy when your client has shown you an inspiration image and you want to capture its mood.
Your client doesn't see "a similar chair" in the visualisation, but the exact one on your shopping list - the one they're about to approve and you're about to order.
More views in the same style
Once one view comes out the way you wanted, you can enhance the next ones in the same style and with the same settings. Click the three dots on the finished variant and choose "Generate views (use style and settings)", then add more raw visualisations of the same interior, for example other views of the living room. KISaya enhances them following the first one, so the whole project looks consistent.
You can upscale each view to 2K or 4K, download it to your computer or save it straight to the list for your client.
How to fine-tune the result
Every AI tool sometimes reads a detail its own way, usually one that wasn't clear in the input visualisation. In KISaya you'll fix it in a few seconds, in four ways:
- Generate the image again. Another try often gives a completely different result.
- Switch the button - "From model" or "From visualisation". The same image is sometimes read differently in another mode.
- Type a specific instruction, with what to change, where, and what to leave alone. For example: "Change the ceiling lights to white", "Remove the pendant light above the table, don't change anything else"; "Remove the pendant light above the table" works better than just "Remove the light".
- Mark the element with a brush on the Cut / Replace tab. You paint over part of the image, choose "Cut object" or "Replace object" and describe the change, for example "replace this vase with a pot of flowers". Marking narrows KISaya's field of view, so it understands better which element you mean.
Is an AI visualisation good enough for a client?
Yes, absolutely. The greatest value of a project is the designer's thinking: the layout, the function, the choice of materials and products, solving the client's problems. Creating the visualisation itself is largely mechanical work, and this is where AI can take it off your hands.
Preparing a render in visualisation software can take half an hour, even an hour. KISaya does it in 30 seconds. Even if it sometimes adds a small detail of its own, say a flower on a chest of drawers, you're still much faster, and you fix the detail with one instruction. Before sending, take a look at the result, as you would with any visualisation or cost estimate.
You can spend the time you save on what really brings value to your client: better technical documentation, site supervision and a calmer way of running the project.
And what if your client thinks they can now do the design themselves? A pretty picture isn't an interior design yet. A design is the conversation with the client, the needs analysis, the functional layout, ergonomics, the budget, the choice of products, technical constraints, procurement and responsibility for the whole project. A client can generate a picture. You create an interior that can actually be built.
How much does it cost, and can you try it for free?
KISaya works in KISjum, an AI add-on you can add to any KIS List plan: START, PRO or EXPERT. KISjum costs €24 net a month for your whole team and includes an AI budget for KISaya and KISjusz, the client survey assistant. Each enhancement uses part of the budget, and how much depends on the KISaya level you choose.
You can try KIS List free for 14 days, no card needed. To start, you get a micro AI budget for testing KISaya and KISjusz. It may run out before the trial ends.
Frequently asked questions
Will AI replace interior designers?
No. AI can show a design in a realistic form faster, but it won't replace the knowledge, experience and responsibility of the designer - from the conversation with the client through to completion.
Does KISaya work with SketchUp visualisations?
Yes. You upload a view from your model or a finished visualisation from design software, SketchUp included.
How long does it take to improve a visualisation?
About 30 seconds.
Does KISaya create visualisations from scratch?
No. The starting point is always your design - a view from your model or a raw visualisation. KISaya improves the realism, the light and the atmosphere.
Can I enhance a facade or a garden?
Yes. Besides interiors, you can choose the "Exterior architecture" or "Garden and surroundings" scene.
Your energy should go into the design
A visualisation doesn't have to eat up your evening. You upload a render, choose the settings, and 30 seconds later you show your client an interior that looks like a photo and is still your design. Try KIS List free for 14 days, no card needed, and test KISaya with the micro AI budget you get to start.